Where we left off
Every component so far, Chat Input, Prompt Template, Google Generative AI, has been something Langflow already ships. A Custom Component is the same kind of object, an inputs list, an outputs list, one method per output, but it's a plain Python class you write yourself. That's the entire contract every built-in component is written to as well, nothing about it is special-cased for Langflow's own code.
Why this lesson runs the graph directly
Lesson 2's README flagged a real Langflow bug: loading a flow that contains a component type the server doesn't recognize (which, by definition, includes any Custom Component that isn't already installed as a package) can trigger a runaway loop in Langflow's migration subsystem, the part that tries to guess what an unrecognized component type used to be called. That path only runs when a flow is deserialized from JSON, run_flow_from_json, the REST API, or importing a flow.json file on the canvas all go through it.
Building the graph in Python and calling graph.arun() directly, what this lesson does, never touches that path at all, there's no JSON to migrate, the component objects already exist in memory. This isn't a workaround bolted on for this lesson, it's a legitimate, faster development loop: you can iterate on a Custom Component's logic with plain python lesson.py, no server, no browser, the same way you'd develop and test any other Python class.
flow.json in this folder is shipped for reference, to look at, not to reload through run_flow_from_json or the REST API. The "Do this yourself" section below builds the equivalent flow by hand in the GUI instead, pasting the component's code directly into a fresh Custom Component rather than importing anything.
Do this yourself
- On a blank canvas, drag in Chat Input and Chat Output as usual.
- In the component sidebar, find New Custom Component (near the bottom of the sidebar, or search "custom"). Drag it onto the canvas, it starts as a placeholder component with example code already in it.
- Click the code icon (
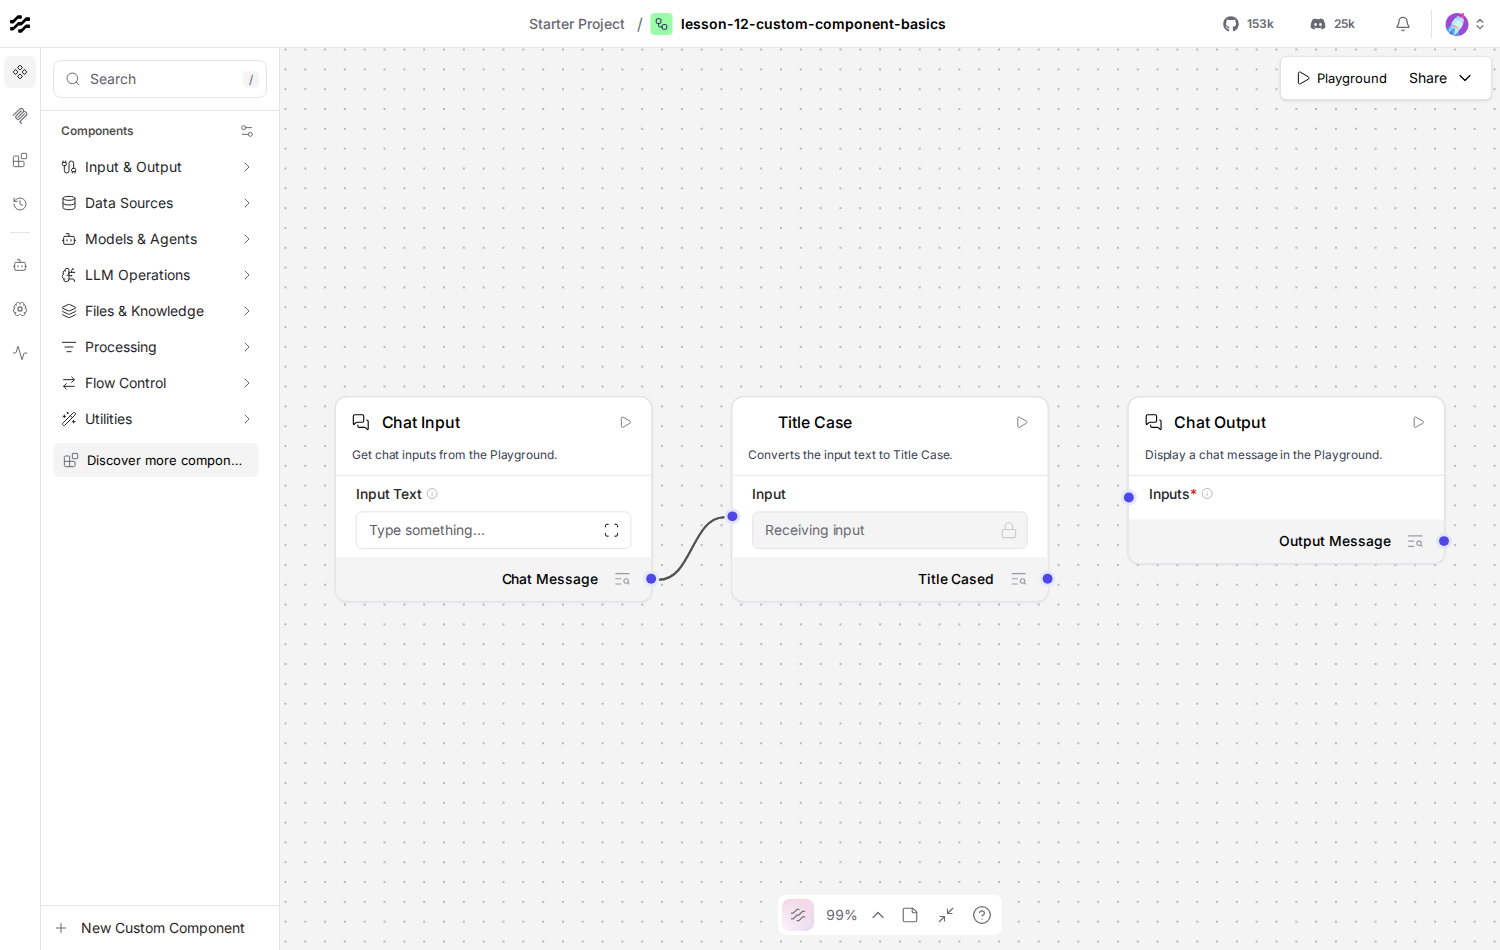
</>) on the new component to open its code editor. Delete the placeholder code and paste in exactly theTitleCaseComponentclass fromlesson.pybelow. Click the checkmark to save, the component on the canvas relabels itself "Title Case" with an Input field and a Title Cased output, read straight from the class'sdisplay_name,inputs, andoutputs. Wire Chat Input -> Title Case's Input, Title Case's Title Cased -> Chat Output. Compare to this screenshot of exactly this:
- Run it in the Playground with something lowercase, confirm the output comes back Title Cased.
The code, piece by piece
class TitleCaseComponent(Component):    display_name = "Title Case"    inputs = [MessageTextInput(name="input_value", display_name="Input")]    outputs = [Output(display_name="Title Cased", name="output_value", method="to_title_case")]
    def to_title_case(self) -> Message:        return Message(text=self.input_value.title())
display_name is what shows on the canvas node. Each entry in inputs becomes a field on that node, each entry in outputs names a connectable output port and points at the method that produces it, the exact same fields the pasted-in-the-GUI version reads to build the node's shape. self.input_value inside the method is set from whatever's wired into the input_value field, chat_input.message_response in this lesson's graph, a typed-in string if you leave it disconnected on the canvas.
graph.prepare()results = asyncio.run(graph.arun(inputs=[{"input_value": "..."}]))arun() is Graph's own direct execution method, no server, no JSON serialization round trip, just this process running the components it already holds in memory. graph.prepare() resolves the run order first (Lesson 5's topological_sort(), under the hood).
Checkpoint
- Custom Component: a plain Python class,
inputs,outputs, one method per output, the same contract every built-in component uses. - why
graph.arun()here: it runs the in-memory graph directly, no JSON deserialization involved, which is what the Lesson 2 migration bug requires to trigger. A genuinely faster iteration loop for developing a Custom Component, not just a caution-driven workaround. flow.jsonin this lesson: shipped for reference only, the hands-on GUI build uses the "New Custom Component" + paste-code path instead of importing it.
If anything here still feels unclear, ask before moving to Lesson 13.